Sunday, November 27, 2011

Button and loop closure

I do believe that I had promised (way back when) to show how I put a loop and button closure on the inside of a skirt with a facing finish at the waist.  One really does need some "insurance" at the top of the zipper, but with this style, a hook and eye closure ends up poking into  your side (ouch!).  So - here goes.  If my explanation makes no sense - hopefully there are enough pictures to illustrate.
Oh, right - this only works with an invisible zipper, which seems to be my zipper of choice on skirts and dresses these days.  Zipper is in at this point, and you're ready to sew on the facing.
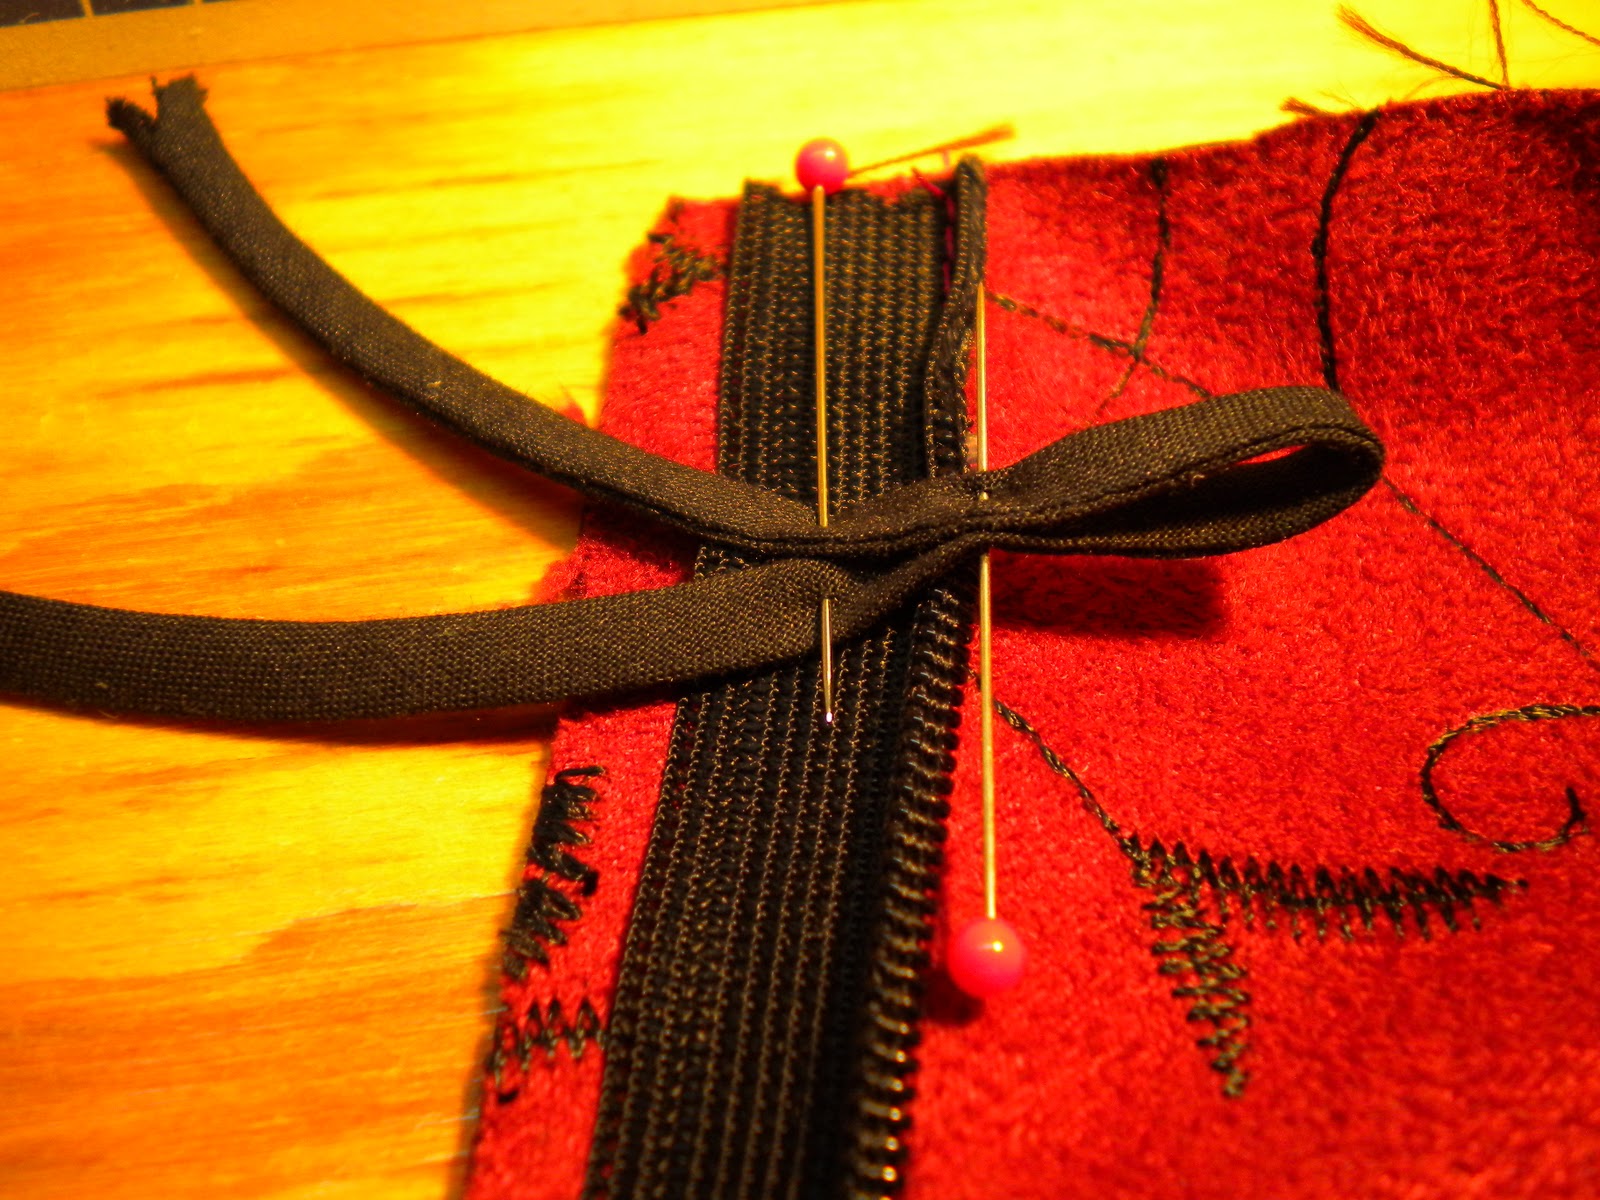
Choose a flat button.  (Buttons with shanks will poke into your side.)  About 1/2 inch or so.  (Good way of using up odd buttons - no-one but you will ever see this!)  You will also need either a piece of very narrow ribbon or a piece of bias "spaghetti", which is what we have here.  Wrap the button with the ribbon and pin.  This is how big your loop needs to be.
Position your loop below the seam allowance at the waist.  In this case the seam allowance was 5/8 of an inch, so the loop is at about 3/4 or 7/8 of an inch below the edge.
Stitch the loop on within the seam allowance.
Place your facing right sides together with your skirt and stitch within the seam allowance.  Do the same on the other side of the zipper seam.

Pin the facing along the top edge of the skirt, wrapping the seam allowances to the wrong side of the skirt.

Stitch facing to skirt.  At this point I always turn the facing right side out, just to check that everything is where it should be.  Turn back to inside out and trim the top seam allowance.  Of course, if you're smart and you reduce the seam allowance while you're cutting, you won't have to trim at this point.
Now all you have left to do is understitch the facing, press and sew on your button.

And there you have the "ouchless" method of making sure that your skirt is going nowhere, should your zipper fail.  

Friday, November 18, 2011

Another red skirt for my closet

The last piece of embroidered fake suede in my stash happened to be a red with black embroidery.  I wanted a longish skirt, and I was really tempted to just whip up a simple A-line.  That would have been boring and far too predictable.  Simplicity 2451 just happened to pop out of the pattern drawer.  The fabric is perhaps a tad too thick and stiff for this, and I'm not yet sure that I'm thrilled with the outcome, which has not stopped me from wearing the skirt.
Definitely a "boots" type of skirt.  All those seams certainly took longer to sew than if I had opted for the "easy way out", but well worth the effort.  I even got pockets in the deal!

The fit was a bit of a trial.  The skirt fit so well that I couldn't imagine even attempting to sit in it, so I did let it out a little just through the hip.  Must have room to sit (and to eat!).  I can't quite seem to figure out the fitting ease of Simplicity patterns.  I couldn't go up a size, because that would make the whole skirt too large, and it did fit decently in the waist.  Don't know if a different fabric would have made any difference in fit.  If I make this up again, I will see.
 This skirt works with this boat-neck top that I made at some point in the last year, which I'm wearing.
 Bonus!  It also works with this jacket!

I thought that I had so much to say about this pattern while I was sewing it, but it seems that I am "uninspired" at the moment, so let's just leave it at that.

Thursday, November 17, 2011

I should have made it a blanket!

This one I probably shouldn't even own up to making.  For the record - I do not get along with polar fleece.  Especially not very thick polar fleece.  (Or may-be I should just blame the sewing machine.)  I picked up the fabric last winter.  The price must have been awfully good.  It must have been awfully cold outside to make me want to buy very warm fuzzy fabric.  My daughter's favourite colour - purple.  Not your standard fuzzy-on-two-sides fleece.  One side looks like a sweater knit.  I started back in the spring while my daughter was visiting, but then other things got in the way.  Now I've finished, packed it up and sent it, but I'm not happy.
Not sunny enough to show the actual colour
I started with KwikSew  2552, an older cardigan pattern, extended the front pieces to meet at centre front.  Cut long pieces for the ruffle and ad libbed that all along the opening.  Serging went well - there's differential feed to play with.  Stitching on the sewing machine was not so pretty.  It reminded me of dough going through the rollers on the pasta machine.  Squeezing through and getting completely stretched and distorted.  Layers of wash-away stabilizer didn't do much to help.  Playing with the pressure of the presser foot didn't help either.  I finally just "bit the bullet" and finished.  I have no clue whether this will end up way too large, since the body that this is intended for is too far away for fitting.  I hand stitched some ribbons on the inside for closures.  Should they be in the wrong place - Taya will just have to resew them herself.  The agreement with my daughter is that, should this really not be fit  to be seen in public when she puts it on - it will just be a cozy at-home garment.  And one needs all the warmth one can get in Prince George - it's COLD up there.
My, that doesn't look purple at all!
No finish on the ruffle edges - just cut them with a rotary cutter.
Obligatory pockets and sleeve cuffs
I was stupid enough to attempt decorative stitching to apply the pockets and do the hems.  Not brilliant, because that only made the stretching worse, but I kept going in the belief that on the next line of stitching I was going to do better.  And there was no way I was ripping out any stitching on this fabric!
Well, there it is.  As the title of this post implies, there were many times throughout this project that I wished that I had just turned this piece of polar fleece into a blanket - it would have been so much easier!

Thursday, November 10, 2011

Oz pillow covers

Remember these pyjama pants?  I made them back in the spring for my daughter.  There were still scraps of the fabric left, so the request was for pillows for the sofa to match the pants.  Eh - why not match your decor to your outfits?
It did take some figuring and planning and highly complicated mathematical calculations, which turned out not quite as intended.  I managed to chop out 2 large pictures for 2 covers.  The "frame" and ties are from some scraps of black batik.  The backs were the labour intensive part of the project.
 Little pictures cut into squares - I'll not bore you with both - they're similar.  I suppose this is what quilters call "fussy cut" - it takes much concentration to actually centre things and manage to actually get recognizable pictures, especially when dealing with scraps.  The mathematics - well, I had intended for these to be 16X16 inch pillows.  They turned into 18X18 inch.  The agreement with my daughter is that I make the pillow covers, then tell her what size pillow forms to buy.  Much easier for shipping to the other end of the country.
So - a few more scraps put to good use - not taking up space in my sewing room.

Monday, November 7, 2011

Copying Burda

Oh,  how I wanted that Burda dress that kept popping up on blogs some time back.  You know - the Burda dress with the pleated tulip skirt and  the boat neck and the 3/4 sleeves.  One small problem - no Burda pattern.  So the dream remained a dream until such time as I decided that I really merited a new dress given that I had not one, but two parties to go to in one day!   ( One was a tenth anniversary party in a restaurant, the other an open house on the occasion of a 50th birthday.)  This decision had me rummaging through my pattern collection last week-end, and this is what I pulled out.
The 1980's dress  - the bodice, given that it was simple enough, with only two darts in the front and two in the back.  The neckline was also similar to the Burda, or at least close enough.  Unfortunately, the sleeves on this one start rather high up on the shoulder.  Enter the other dress pattern for sleeves and armscye.  Not quite right when I made up the dress - not to worry - one blouse pattern available with just the right sleeve width.  Fixed that problem.  For the skirt - (who'd a thunk!) the skirt pattern!  View F to be exact.  Perfect.  Oh, except maybe for the fact that as beautifully as the front bodice and skirt front mated - the skirt back was way too big for the back bodice.  That was an easy fix, though - just chopped off the excess amount along the back seam of the skirt, and all was well.
Now you can judge for yourselves if I'm even close.
Front
Back
 The fabric is a dark navy poly crepe.  Not an utterly gorgeous fabric, but not bad.  It's best feature would probably be its washability and wrinkle resistance.  It was quite comfortable for all day wear, and I was very much at ease, knowing that should anything spill on it, cleaning it up would be a breeze.  With poly fabrics I find pressing to be a bit of a challenge, and this one seemed determined to leave marks at edges of seam allowances, etc., no matter what.  Sometimes you just have to ignore certain imperfections to get on with the project.  Let's just leave it at the fact that I could not have possibly expected this to behave as a fine silk or wool.
And I suppose you'll be wanting to see "this is how I wore this" photo, so in between parties, while popping home to let the dog out (one does have to remember about the needs of those who guard our homes while we're out having fun), I did manage to snap a picture.
with "demon dog"
So there you have it.  I had my dress in time for "the ball".  Let me just add that it was definitely a very big help that the clocks were being changed back from daylight savings - I had a whole extra hour to sew on Saturday night!  (Is that called self-delusion?)

Tuesday, October 25, 2011

More chef's pants

I was really debating whether to post this picture or not.  After all, these are really rather boring.  Guess this is just to prove (to whom?) that I have been sewing, even if the results are rather boring.  Two more pair of elastic waist pants in black Galaxy twill.    Enough cotton to make them comfortable, and enough polyester to make them pretty well wash-and-wear.  (Well, probably only because mother isn't around to scowl at wrinkly clothing.)  The first pair I made back here.  The only request after the first pair was to make the elastic tighter.  (Good thing that I made notes when I sewed the first pair, because it's been a while.)  And this time around I made a loop and button at the top of the zipper.  Now that I look at the picture, I realize that this fabric, despite careful pressing, refuses to look pressed, so perhaps it's not even worth it getting an iron close to these.  Soon enough I'm sure, these will be sporting lovely blobs of sauce of one kind or another and large grease spots - trademarks of the profession. 

Easy though these pants should have been, there were periods of intense "unstitching".  Reason being - my mind was wandering.  So, a note to myself, and to anyone else who might benefit from it - pay attention, no matter how boring the project at hand.  Don't get cocky.  Just because "it's the easiest thing in the world", doesn't mean that mistakes can't be made which leave you wondering, how on earth you managed to do something so stupid.  (Confession - I managed to do something quite "interesting" with the pockets - I'm not quite sure what I did - but the result was having to undo a whole lot of stitching before I could put things right.  And as luck would have it - I managed to do the same zany thing on both pairs - double the ripping!)

Now I'm trying to finish off my daughter's somewhat belated birthday present before I can get back to my own sewing.  And something tells me that I really should start thinking about Christmas presents, that is, if I'm crazy enough to be making things.

Sunday, October 23, 2011

Creative Festival

I didn't think I would be able to, but I was lucky enough to go to the Creative Festival in Toronto on Friday.  There was so much to see, so many lovely things to paw at - I didn't really have time to take it all in before our time was up and I had to go back to the bus.  The one booth where I was really blown away, was Gaudet Fashion House.  These two fellows make the most amazing felted coats.  I just had to get back at the end of the day for a second look (and feel).


These are the most amazing coats I have ever seen.  Of course, there were workshops on this technique, which I was not lucky enough to get to.  Who am I kidding - even if I knew how to create this felt, I would never get around to actually making enough fabric to create such a coat.  Well, I can dream.  Notice - I don't dream of owning one of the coats created by someone else - I dream of being able to create such a coat.  Is there something wrong with my thinking?  Life would be so much easier if I didn't always think that I have to make everything I dream of.
Of course I didn't leave empty handed.  I finally have my very own Soho coat pattern from the Sewing Workshop Collection, which I've been "thinking about" for ages.  (Even got to talk to Linda Lee - the designer!)  What looks like black, is actually black and brown herringbone printed velveteen (so soft) and the other fabric is an absolutely luscious Italian wool for a pair of trousers.  And that little bit in the front of the picture is a small piece of the softest black leather.  I need a very small piece to patch my mother's gloves.  (That was the "excuse" for buying the leather in the first place.)  The rest will be - who knows - piping? binding? - well, some sort of accent on some sort of a jacket.  I'm determined that it will not sit in a box for years before it gets put to use!

Sorry - we're back to that time of year when outdoor photographs are next to impossible, so it will be back to figuring out something in terms of decent enough lighting to actually show things decently in pictures.  This was just a quick shot on my cutting table, and obviously, though well enough lit for me to cut - not nearly well enough lit for a decent picture.  I'll just keep on trying!