Friday, July 29, 2011

Grey dress done!

The grey dress to go with the pink jacket was done and worn yesterday.  I had a few "fitting issues" - nothing major, but I just had to be in the right frame of mind to deal with them, so I took some breaks, as you well know.  I used Simplicity 2473.  The fabric is a silk noil.  I've used silk noil before for casual pants, and once those pants started going through the washer and dryer on a regular basis, they started looking "worn" and slightly "fuzzy", which is all fine and good for casual pants.  Not the look I would want for this dress, so I didn't prewash the fabric, thinking that I would take this dress to the cleaners.  Not very practical - light colour -  summer dress - very comfortable, therefore will probably be worn all day.  Now I'm wondering whether I could just hand wash and hang dry to avoid the "fuzzy" and "worn" look.  Anyone with insight - please let me know.
My fitting issues were, as usual with a SBA.  I pared down the "bump" of the side front piece, as well as taking in at the side seam.  The other "issue" was the part between the waist and hip, or at least where the hip is on the pattern.  I jut out from the waist, instead of sloping gradually, so on some patterns it turns out to be a tight fit at that point.  With the midriff band and the gored skirt, it needed some finessing to make things look right.  When I take a deep breath and work through this slowly, it all works out - I just have to be in the right mood.  (At least now it's all figured out for the next time I decide to use this pattern!)
Let's add one of the back view, what the heck.
I underlined the top and the midriff band with batiste.  No interfacing on the midriff - I figured the underlining already took care of that issue.  Then I got rather carried away with the topstitching and forgot to sew in the skirt lining at the appropriate time.  Never fear - handstitching to the rescue!  I backstitched the skirt lining first, then pinned the midriff lining and sewed that on with a fell stitch.  It all worked out in the end.  No lining on the bodice - there are already two layers there - and do I need a layer of polyester on my upper body?  The dress went for its debut yesterday - a grey, humid, though not too hot day.
Here it is in action with the pink jacket.  Bonus - I have yet another outfit to wear with my pink shoes!  (Why did I buy pink shoes?)
(Note to self - really must learn to stand up straight, and not look so uncomfortable.  Maybe I should practise modeling poses - may-be not - then the dog will definitely think that I'm crazy.)

Monday, July 25, 2011

Uniform and flower power

Grey dress is done - only needs a final press.  Unfortunately, it's been too hot to even contemplate putting it on, therefore no pictures as yet.  In the meantime...
I made a uniform shirt for a friend who doesn't fit standard sized uniform shirts.  She's "battling it out" in camp with the kids as I write. 

Kwik Sew 2835
Made it in a cotton/poly batiste, so it should be cool - not like those "plastic" uniform shirts that everyone else wears.  It's probably as hot in Illinois as it is here, if not hotter.
Kwik Sew 3169
Sent that off and tackled outfits for Project First Day - first day of school outfits for kids in Joplin, MO.  I made two the same - the flowers are positioned differently on the two blouses.  What I didn't realize, was that the skirt in the pattern is made up of little squares - a patchwork!  No time for that.  I ended up doing some (not so) quick mathematical calculations and drafted more or less the same skirt, but with only two pieces - front and back.  The skirt fabric is a navy crinkly gauze, which I handled with some trepidation - especially the hem.  I ended up sliding a piece of tearaway stabilizer under the fabric as I stitched the hem by machine - and all was well.  No stretching!  Oh - I had to line the skirt with a broadcloth - twas a tad too sheer for decency.  The blouse fabric is a cotton/poly mix., with a white background, despite what it looks like in the photo.  What else can I tell you?  Of course, I needed to snap a picture in a hurry, because I had to get those outfits sent, and of course, after weeks of no rain, we had thunderstorms and clouds and - no outdoor pictures possible.

Friday, July 15, 2011

Designer dress simplified

It all started with this.
 Vogue 1153 by Anna Sui.
I made it up last summer to wear to a baby shower.  One of those very rare occasions in the last number of years where I brought a pattern home and immediately opened it and used it.  (I did lengthen the skirt quite a bit.)  One very comfortable "fussy" dress in silk.  (Just for the record, it hasn't been worn since.)  Well, the lining piece for the front bodice has a very simple rounded neckline, which got me thinking that this would make a very comfortable plain summer dress for casual wear, minus all the ruffles.  First try was this.
 I extended the shoulder seam by one inch, used the lining front and made a casing of the seam allowance at the waist for elastic.  Somehow that front with ruffles worked fine.  Without ruffles there seemed to be way too much puffy stuff going on at centre front.  That was last summer.  Fast forward to this summer.  I did start a grey dress to wear with the pink jacket, because one really does need more than one outfit per jacket.  Had some issues with fitting that needed to be resolved.  Wasn't in the mood for those.  Didn't  want to ruin the dress.  Sewed up some stuff for the children's camp that I periodically volunteer for.  Sent that off.  Still not in a mood for fitting issues.  Aha!  Back to figuring out that "perfect casual summer dress".  I removed 4 inches total at the waist at centre front from the bodice, and altered the skirt piece to match those measurements.  Here is the result.
I know.  I know.  The I should have actually paid attention to the design on the fabric.  My excuse is...  This is a lovely (to feel) piece of rayon.  "Inherited" from someone or other.  The print is horribly off grain.  I decided that it was more important to lay things out on grain, than to worry about where the print was going.  This is an "at home" dress, and I just had to get the idea produced, rather than worry about all the other stuff.  Well, if worse comes to worst I can always pop a little black jacket over this to run over to the grocery store.
I'm now happy with the results.  One very comfy dress.  And now this has me thinking that this could also work in something warm and snuggly for winter wear, with the addition of sleeves.  Now it's back to the grey dress!

Friday, July 1, 2011

Chocolate & cream

What would you do to prepare a piece of vintage silk for cutting and sewing?  Why, of course - throw it in the washer, then the dryer and surprise, surprise - it survived.  And how do I know that this piece was vintage? - when was the last time you actually saw 27 inch wide fabric?  I know that by the time that I was learning to sew, this width was already considered "old", and that was late '60's.  This piece probably came from my mother-in-law's stash, and it did need a wash.  (being so old, 'n all)  I barely managed to get this sleeveless blouse out of the piece.
I wanted a ruched standing collar.  Where I got that idea I have no clue - probably saw something similar in n old movie.  I just keep filing ideas in the old brain when I watch movies, look at magazines.  Can't draw to save my life.
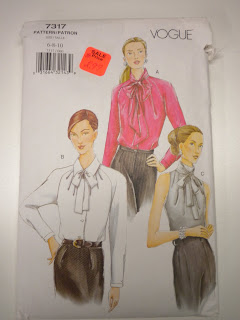
Started with Vogue 7317, View C (no bow).
Widened the shoulder seams, because on a previous version, I found such a high cut shoulder to be rather uncomfortable (I really have hike those straps up to my neck, which is not a feeling I happen to like).
Now for the collar
- I widened the collar by 3 times the finished width, gathered it on the ends, in the middle and somewhere in the vicinity of the shoulder seams.  Stitched it down to a piece of interfacing, which in reality was a piece of broadcloth.  (Broadcloth makes great interfacing, at times.)  Don't know if this is the way it's "really" done, but it worked.  Then proceeded to put the collar together somewhat like a shirt cuff.  (Thanks, Sherry, for the super way of finishing the ends of cuffs - worked like a charm in this instance.)  Added loops and buttons (it should be hooks, according to the pattern).
As for the buttons - had some really cute little brown triangles.  Measured and measured for the loop size.  Thought it would work, but then I had an awful time getting the buttons through the loops.  I just couldn't imagine myself struggling to button and unbutton this darn blouse, especially at the back of my neck, so I did the sane thing - went to the store and bought smooth buttons that just glide through the loops.  Went with bias strip for armhole finishing - I so dislike those floppy facings.  And of course - must have keepers, because, heaven forbid should those straps show!
What should have been a very easy project, became a little fiddly with the collar details, but it's done.  Best part - it's machine wash and dry!  Easy care.  Irons like a dream, too.
Happy Canada Day!  Now I'm off to watch fireworks - from my father's hospital room.  The view should be spectacular from the 9th floor.