Tuesday, September 21, 2021

Pencil skirts

 Back in the very early Spring, I started looking for some summer inspiration, and I came across a picture of a young lady in a pencil skirt and shirt.  Truth be told, there were plenty of images of pencil skirt + shirt.  But this particular one was not just any pencil skirt – this one was white and blue toile.  (I could have sworn that I saved it on Pinterest, but apparently not.  You’ll just have to trust me on this one.)  This seemed like a pretty good starting point to a summer “uniform”.  I find pencil skirts comfortable and most importantly – I can function in them all day, unlike some rather voluminous skirts that I have that seem to always get in the way when I’m trying to do certain things.  So – a plan.  I became a bit obsessed. A bit too much time spent on internet “research” for fabric, because I had nothing that looked anything like the picture.  Neither did I find anything remotely similar or pencil skirt compatible on any of the sites that I browsed.  Then at some point between lockdowns, when Fabricland was actually open, I decided to go for a browse.  Nothing sparked my imagination – I must have made the rounds of the “fashion fabrics” at least twice.   Feeling like my balloon had deflated, I headed off to the home dec section and there I spied the elephant print – well, it’s not just elephants – rather a whole African menagerie.


100% cotton … a little bit stiff … but I was sure that after a run through the washer and drier it would work quite well.  Oh – and the price was right … $5 per metre.

Back view (in case you couldn't figure that out).  Even found a random blue button that matched.
Hong Kong finish on the hem, but obviously that detail didn't make it to the edge of the back slit.

Unfortunately (or may-be fortunately) I didn’t stop at 1 metre of one fabric.  I found 3 more!  If I was going to adopt a uniform for summer, I certainly needed more than one skirt for the purpose.

Brown and grey paisleys.

Another lonely button put to good use.

I used my self-drafted pattern – midi length.  Made slight changes in the way I finished the back slit/ pleat and waistband – it would be way too boring if I made exact duplicates.  So - three skirts happened in fairly quick succession.


And what the can I call this print?
Please ignore the misaligned print.   Much effort was expended on matching of this print and trying to keep things on grain, but when all was said and done - I was off.  Oh well - I can't see my back side, so I just pretend that everything is lined up perfectly.

Because this home dec fabric, cotton though it may be, is a little rough, I added shortie silk linings into each of the skirts - just so they wouldn't get caught up on things.  Pencil skirts have to hang properly to look good - no?
Number 4 is on a black background, and after No. 3, being quite sick of pencil skirt sewing, I decided that the dark fabric would have to wait until Autumn.

And now for my rather sad attempt of picture in mirror.  I know that everyone likes a good picture of person in garment - I'm working on it.  

Now as for the shirts to go with the skirts … they’re not hopping from fabric stash to closet at quite the same speed.  Shirts take longer to sew than pencil skirts, and apparently I can’t keep motivated stitching the same shirt in different fabrics one after another.  About the progress on those … later.


Friday, September 10, 2021

Burda Style 6342


This has got to be one of the easiest patterns around.  It is also a quick way of using up yardage if your objective is to use up fabric stash with little effort.  One pattern piece for both the front and the back, plus waistband.  Oh – I guess you have to like skirts…  I happen to wear skirts a lot, and I also happen to like full skirts.  Check and check.  The big pleats front and back lie flat -  no extra fluff below the waistband.  And the only place you really have to nail the fit is the waistband.

The suggested fabrics on the envelope are somewhat stiffer fabrics, so of course I did the complete opposite for my first version … a very drapey rayon challis.


According to the instructions, the zipper goes up into the waistband – not something I like, so I stopped the zip at the waist and opted for hooks to keep the waistband together.  Granted, that did require extending the waistband piece a little to allow for overlap.

And then there was version two - just because the first one went together so quickly.


This is a hand-woven silk from Thailand.  The interesting stripes and horses are all uneven … and the fabric was incredibly narrow.  Not a hope of ever making anything match at the seams.  If I didn’t just cut and make something, that fabric would languish for many more years, and it really did need to get out in the world and be something.  So – I did have to put a seam down centre front and centre back just to get the width needed for the pattern piece.  I did the best I could to more or less have all the horses galloping in straight rows. 

Inside view, just so that you could see how those pleats are formed.

I just ignored the parts where the stripes wouldn’t behave.  Now that it’s made up – I wear the skirt and don’t look at the seams.  And because it is a rather heavy silk, this skirt does work well year-round – with sandals in summer and boots and sweaters in winter.  Not exactly an everyday skirt, so not too many chances of it going out into the world, but it has had some wears – unlike my third version …


Before I folded up the pattern and put it away, I decided that one more version wouldn’t be amiss.  This is quilting cotton.  I just fell in love with these butterflies, despite the fact that the turquoise isn’t something that I normally gravitate towards.  And – there’s some gold throughout – just enough to make this a “party skirt”, and I knew from the outset that this was going to be a skirt.  Never mind that everyone else buying this fabric was cutting it up for quilts.  I did not prewash the fabric.  I was warned by those who are wiser than I in the ways of quilting fabrics that the gold would wash out, and I did know that the sizing, which gives it a bit of gloss, would also disappear and the character of the fabric would be ruined.  So yes, I made a party skirt just at the time when all parties came to an abrupt halt, and my poor skirt has not been outside my closet since it came into being.  May-be now that we can more or less “normally” go to church, I could give it an outing on a Sunday morning – with boots and a sweater … but there are so many other things that are clamouring for an outing.  We’ll see.  

Sunday, July 11, 2021

Sienna Maker Jacket by Closet Core Patterns


I ogled this pattern as soon as it came out.  Needed to do a lot of thinking before I ordered it, because it’s boxy/baggy, and that’s not my usual thing … but …there’s a belt to cinch it in.  And there are all those cute pockets that I will never use, but look so “neat”.  I finally ordered it, as well as the D-rings that you need for the pattern – times 2, because if I’m going to spend serious money on a pattern, it is definitely going to be used more than once.

That was last summer.  It was October by the time I actually got around to this pattern.  Other things got in the way.   The weather was still warm enough, and I thought I just might get a few wears of my new linen coat before the weather turned.  Not so.  By the time I finished (lots and lots of precision stitching on this one) it was definitely way too cold for an unlined linen coat.  It was relegated to the closet until the weather warmed up after a long slog through winter.

Fabric – a fairly stiff linen. Colour - oatmeal – which made it a dickens of a thing to take pictures of.   Not all linen softens up after washing.  Of course I prewashed and dried it in the dryer, but that didn’t really do much to soften it.  This linen was ordered for a class on embroidered tablecloths, as I remember, but – there was rather a lot that went unsold, and I just had to rescue a few metres to sit in my stash for a while.  Because it’s so stiff, I did not use any interfacing.  If this linen ever softens up enough that the collar and the lapels stop behaving properly – guess I can always give it a few spritzes of starch.  As for distorting – don’t think so – so much topstitching and edge stitching keeping things in place – nothing’s going anywhere it shouldn’t. 

The fit is loose – very loose.  I could have probably done with the Size 2, but when I made the Kelly Anorak, the size 2 felt a little too close on the shoulders – not comfortable if one is supposed to be able to stuff a layer or two under the jacket.  (Which was my thinking back in October, when I was sewing this.)  So I went with a size 4.  If we're going bigger - might as well go bigger all the way.  And - I just wasn't in the mood for fiddly fitting.  Didn’t know if I would be happy with this decision, but now I’m living with it, and that’s that.  (I can definitely get this over a bulky sweater.)  I should have made some sort of small bust adjustment, i.e. taken out my usual inch on the horizontal across the front.  Alternately – I could have moved the opening thingy for the belt up a bit.  I did neither.  So when the belt is wrapped around me, there’s some “pooling” of fabric above the waist.  This is a loose jacket/coat – I’m not going to quibble.  And mostly I’ve been wearing the coat undone.

Belt on the inside.

Which brings us to the question – what to do with that rather long belt when it’s not being used for its intended purpose?  Well, you can roll it up and stuff it in the pocket.  Didn’t like that option.  After a few wears with safety pins holding the belt on the inside, I made belt loops inside at each of the seams, and I just thread the belt through and pull it out of the little opening to the outside.  Seems to work just fine.

Inside view  - belt carriers.

Got to use the cute little bar tack on my machine!

Decided to go for the bias tape finish on the armhole.

Love this coat.  It goes to the grocery store.  It goes for walks – well, at least when the weather isn’t too disgustingly hot and humid.  Lovely big pockets to hold my phone (so I can listen to my audio book enroute) and keys.

Having spent a fair amount of time on the first Sienna and not having the satisfaction of actually wearing it right away - I was determined to fix this problem.

Fall/winter Sienna

Promptly cut it out in a wool/cotton/something mix.  Left off all the little pockets.  Made the big pockets lie flat.  (They stick out a bit on the original.)  Left off most of the topstitching.  Lined it in flannel-backed lining – of which I didn’t have enough – using scraps – so had to do a little creative piecing.  Made a separate belt and belt carriers on the side seams.

"Interesting" piecing on the lining.

Lots of room under this for sweaters. Very definitely a grab and go coat. It was probably my most worn coat over the winter season.

There’s another one planned – I did buy 2 sets of D-rings!  Initially, I thought that I would make all three views of this pattern.  When that will actually happen – who knows.

Wednesday, June 2, 2021

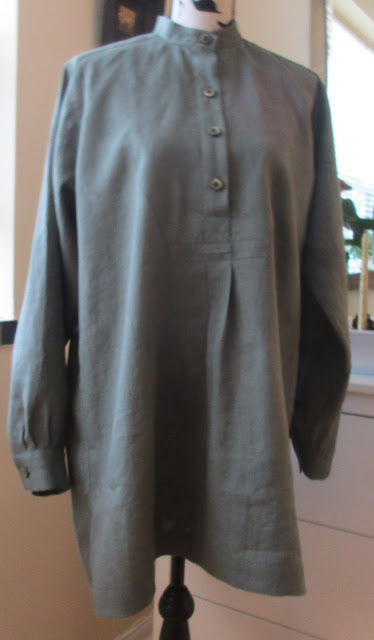
Folkwear Patterns Victorian shirt – take 3


About time I crawled out from under my rock, stopped just lurking on the internet and got back to actually posting on this blog.  We’ll skip the explanations of why I’ve only been lurking and how it’s (for some crazy reason) embarrassing to get back to actually documenting what I’ve been sewing.  I know that I have to improve my photography.  (Haven’t I mentioned this more than once before?)  Bear with me.  And for starters, we’ll go with something that I already have pictures of – no matter how bad.  The shirt was a Christmas present, so no chance of retakes on the pictures – it’s at the other end of the country.

Son’s favourite pattern happens to be the Victorian Shirt from Folkwear Patterns.  This time I thought I’d introduce him to the joy of wearing linen, which also meant that I could order from a site that I’d been drooling over for a while – Pure Linen Envy.  Sent a link to D – he chose a colour.  (And yes, I just happened to order a few more pieces than what was needed for D’s shirt.  Had to have “samples” of the 3 different weights of linen that Pure Linen Envy carries.  Further linen projects yet to be sewn – hopefully in the next few months.)


This is their mid-weight fabric called “Summer Breeze Linen”.  Sorry – can’t remember which particular green this is – not that you can even tell it’s green from my pictures.  Perfect for this shirt.


Nothing new here.  I’ve made this at least twice before.  Although, every time I have to scratch my head at the way the front placket is finished at the bottom.  I really should make some notes on the pattern instructions for my way of doing it.  (Keep me from scratching my head.)

And … drumroll, please … I was actually sent a photo of real person wearing shirt (that would be my son)!  And … you can actually see that it is a green shirt.  Now … I happen to think that the sleeves should be a bit shorter, and the whole shirt could be a bit shorter. (We had this discussion while I was on a visit to the wilds of B.C., and I was poking my nose into my son’s closet.)  According to my son – he likes the pattern as is, and I’m not to change a thing.  I won’t argue.


Whenever I send a shirt (or some other article of clothing), I always include a little card with extra thread and extra button. 


Whether they are ever needed or used, I don’t know, but at least I’ve done my duty to make sure that the shirt doesn’t have to bear the ignominy of sporting a mismatched button.